DIY GEAR MIRROR WALL DECOR
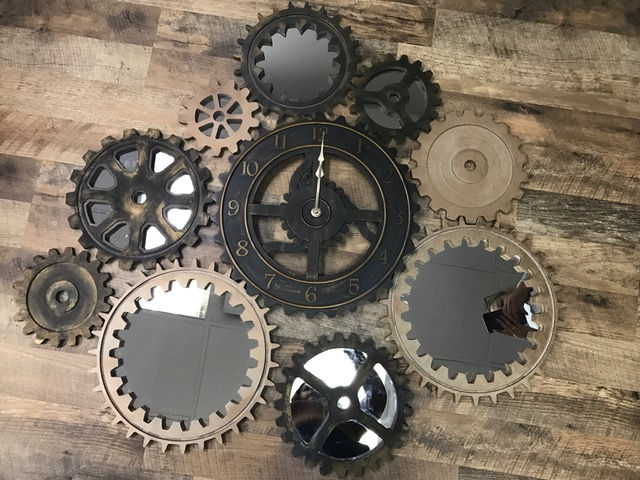
I don't know about you, but I am constantly loving cool decoration elements but they are almost always WAY out of my budget. For example, I have been wanting to have mirror gears like this one , but I was not going to spend $260 on one gear! I did not want to spend that much on the whole design, let alone on just one piece. So, I decided to create my own on a budget of $200. Here's the final product:


I absolutely love the way it turned out, its got this very modern and industrial feel to it. Not too masculine or feminine. Every time someone walks in, it's the first thing they compliment.
So Here's what you would need to make these awesome gears:
Materials-
Unfinished wooden gears in assorted sizes. To find the ones I got Click here.
I ordered the gear set ranging from 8" to 12"- price $42.00, I also ordered two large 15" gears - price $15 each. (This Etsy shop is great, they have a ton of custom designed gears to choose from).
Spray Paint- I chose a dark-steel metallic and a cooper/gold metallic. To give the dark steel gears a more rustic look, I hand painted over it with copper shimmer pain, like this one:

Round Mirrors- I bought mines at Jo-Ann Fabrics and Crafts, they had them in the store( click here)
Glue- Wood glue, gorilla, or E6000 would work well.
Frame hanger hardwear - Saw-tooth Hangers, triangle ring hangers, etc.
Double-sided tape- The heavy duty type.
Directions
Spray paint your gears what ever colors you desire, DO NOT paint the back of the gears, as you want to avoid unnecessary paint residue to stick to your walls .
Once your gears are dry, measure the dimension of the opening of the gear. For instance, the 15" gear has an opening dimension of 11.5", see picture below.

Now you need to get your mirrors. You want your mirrors to be slightly bigger than the opening of the gears. So, for the larger 15" gears, I bought 12" mirrors. As a general rule, subtract 3" from the gear sizes and that should help you determine what size of mirrors you will need. (if you do not have a Jo-Ann's or Michael's near you or need to order them online, I suggest to measure the gears and order the mirrors before spray painting)
Now it's time to glue your mirrors to your gears. I would recommend using wood Glue, as it is pretty strong, but you can get whatever you prefer as long as it has a strong hold. You want to put glue on the back of the gears near the openings. If you are using gears that extend to the middle, you need to put the glue in the back of the extensions as well. (Note: wood glue can get a little messy so try not to put to much as it will then start to come out of the sides and dirty your mirrors)
Here's what they looked like when they are dry and ready:


The last step is to put something to hang the gears with. I used saw-tooth hangers with no nails.
I also wanted to incorporate a geared clock and I found an awesome one at Walmart, it's called Better Homes and Gardens Gears Wall Clock, Three Independent Clocks. It was $45.00 and I separated the clocks.

Once you have put your frame hangers, just pick a layout you would like to use on your wall, Making sure that your gears will intertwine with one another. I laid them on my floor and re-arranged them several times before I found the layout that worked best.

Once you are ready to hang your gears, start with the biggest or the one that you want to stand out the most. Then work around it so they fit properly. Use double-sided tape to help secure them.
And there you have it, hope you've enjoyed!

